Shadowrocket Official Guide · Getting Started
Shadowrocket
Import a Subscription and Connect
Using the iPhone / iPad interface, start by adding an existing server, then choose a routing mode, connect, and verify the result. Follow these five steps for your first setup; save advanced configuration for after the connection works.
Step 01 · Add Server / Subscribe
Add a Server or Import an Existing Subscription
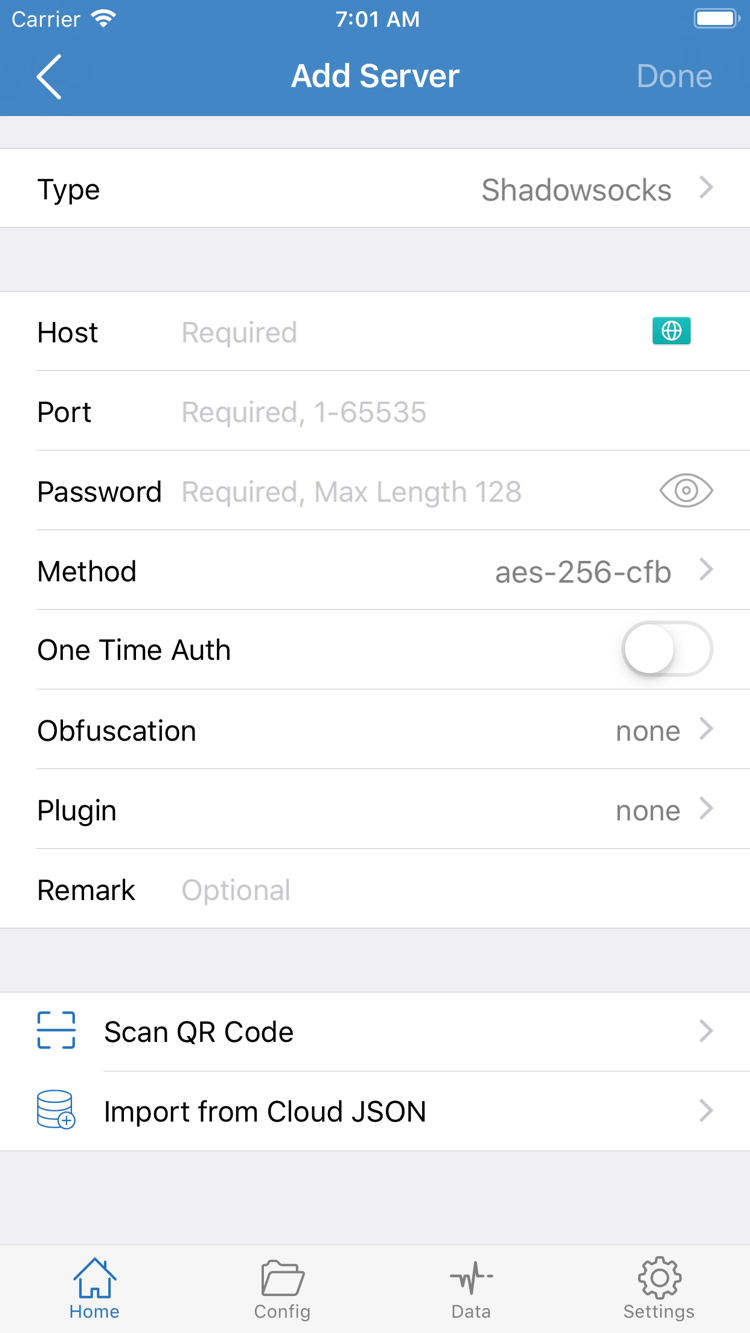
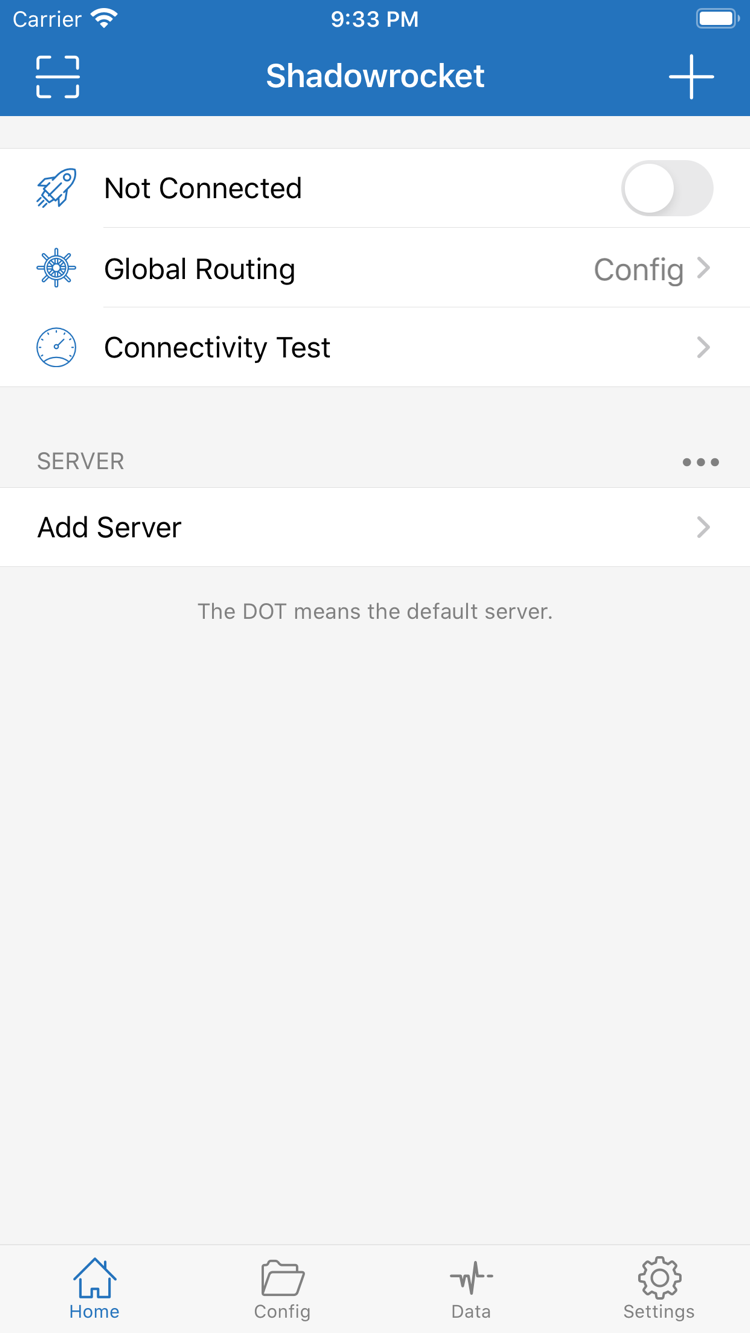
Open Shadowrocket and go to Home at the bottom. If nothing has been added yet, find Add Server; you can also open the same form using the add button at the top right. There are two ways to proceed: use Subscribe for a subscription URL, or select the relevant protocol type for individual server details. First identify what kind of information you have. Do not enter a subscription URL in Host.
Have a subscription URL? Choose Subscribe
In Add Server, tap Type and choose Subscribe. Return to the form, paste the complete URL into the subscription address field, enter a name you can recognize, and save. Copy the entire URL in one go, from start to finish, including any parameters after the question mark. Do not include explanatory text, quotation marks, spaces, or line breaks from a chat message. Subscription URLs often contain personal credentials, so protect them like passwords.
After saving, return to Home and wait for the subscription to load. Check whether the relevant group and servers appear under SERVER. If you see the subscription name but no servers, first check whether the update completed and whether an error appeared; do not keep adding it repeatedly. Importing the same URL more than once can make the list harder to read and will not fix an expired URL.
Have server details? Fill in Add Server field by field
If you have an address, port, password, and protocol details, select the correct protocol in Type first, then fill in Host and Port. Enter only the hostname or IP address provided by your service provider in Host; enter the corresponding port in Port. Whether Password, Method, and other fields appear depends on the selected Type, and not every protocol uses the same fields. The screenshot shows one set of fields; it is normal for the form to change when you select another protocol.
For example, check that the Method and password for Shadowsocks match. For Trojan, enter the password and TLS-related settings as specified in your details. If the details also list SNI, a transport method, or a path, check the corresponding settings rather than inferring the protocol from the port number alone. If a field is unclear, consult the glossary; use your own server details as the source for parameter values.
If you have a QR code, use Scan QR Code in Add Server. Allow camera access before scanning, then check the detected Type, Host, and Port. If the clipboard contains a single share link, follow the import prompt shown by the app. Import from Cloud JSON is a separate entry point for structured data, not a regular subscription URL field. Do not mix different formats.
Step complete when: You can find the server you intend to use under SERVER after returning to Home. A name in the list only means it was saved or imported; it does not prove the server can connect. Continue by choosing Global Routing, then test the connection. For subscription updates, organizing groups, and bulk management, see the subscription and server management guide.
Step 02 · Global Routing / Config
Choose a Global Routing Mode
After adding a server, return to Home and open Global Routing. This setting determines how traffic is routed; it does not control subscription updates. The three modes are Config, Proxy, and Direct. Before you begin, decide whether you are checking if the server works or whether your own routing rules are correct. These require different checks.
Config: Apply rules from a configuration
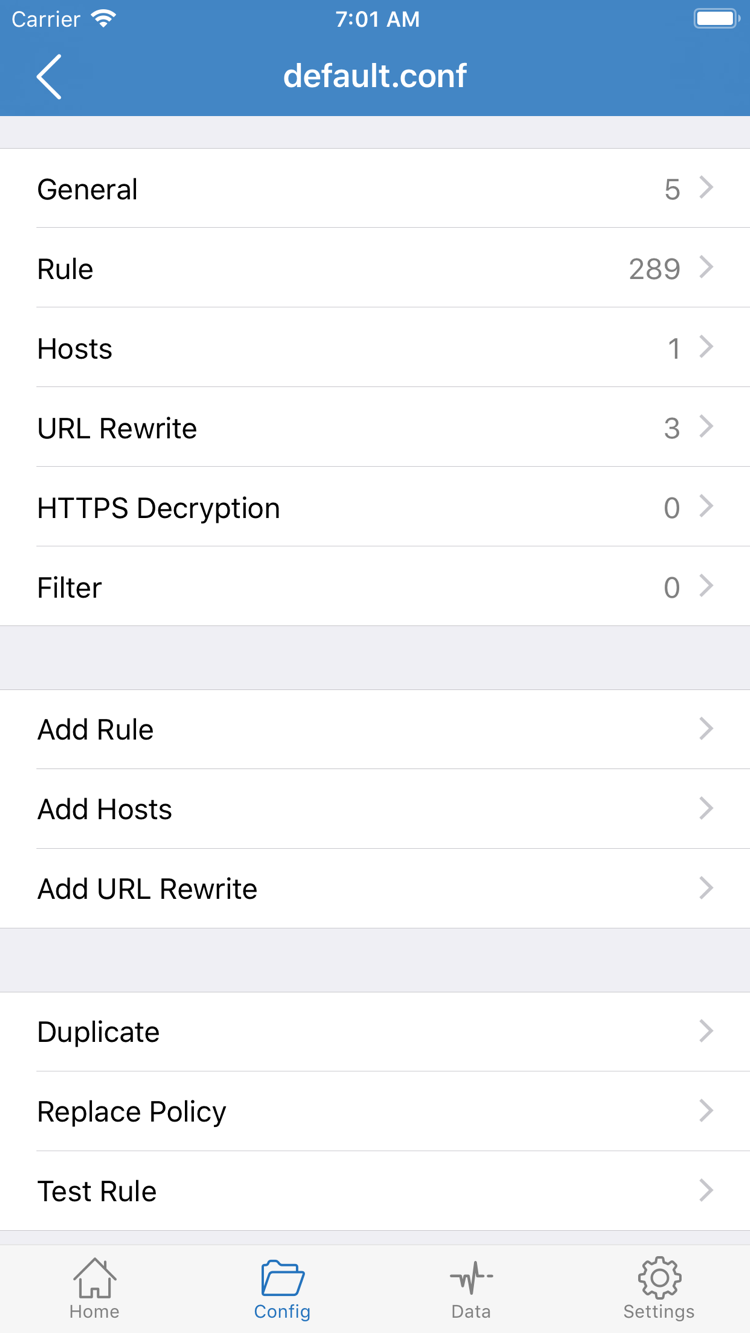
Config matches traffic against the currently selected configuration file. If you need rule-based routing, open Config at the bottom, confirm that a usable file exists and select it, then return to Home and choose Config in Global Routing. Rules have an order, and the first matching rule usually determines how a connection is handled. Having servers in a subscription does not mean Config already contains all the policies you need.
The official screenshot shows the configuration editor in Config, with sections including General, Rule, Hosts, URL Rewrite, HTTPS Decryption, and Add Rule. You do not need to edit each item when getting started, and you do not need to enable HTTPS Decryption just to connect. If your service provider has configuration instructions, first check which cases they apply to. If you are unsure, keep the existing configuration and back it up before editing.
Proxy: Isolate the effect of rules
Proxy sends traffic handled by the current proxy connection through the proxy route, which can help reduce the effect of rules while troubleshooting. You still need to select an available server on Home and turn on the switch at the top; changing Global Routing alone will not correct server settings. If destinations work in Proxy but some fail in Config, focus next on rule matching and policy targets.
Direct: Use a route without a remote proxy
Direct uses a direct route and is not a way to confirm that a remote server is available. Do not treat an enabled switch with Direct selected as evidence that the server connected successfully. After comparing modes, restore the mode you plan to use so a temporary troubleshooting choice is not left in place.
Step complete when: The option shown on the Global Routing row on Home matches what you expect. If you chose Config, you should also know which configuration is active. See the glossary for terms such as DOMAIN-SUFFIX, GEOIP, and FINAL; rule writing is outside the scope of this page.
Step 03 · Home / SERVER
Select a Server and Connect
Return to Home and select the server you want to use in the SERVER group. Check that the selection indicator is on the correct entry. If you have multiple subscriptions, check which group the server belongs to, then verify its name. Importing a new subscription does not necessarily switch the app to a server from that subscription. If your configuration uses a separate policy group, make sure the relevant policy does not point to an invalid entry.
After checking Global Routing, turn on the connection switch at the top of Home. The first time you connect, the system may ask to add a VPN configuration. Confirm that the request was triggered by opening Shadowrocket, then follow the system prompts to allow it and complete any required device authentication. This uses the device's own confirmation method; you do not need to send device unlock information to your subscription provider.
After authorization, return to Shadowrocket and check whether the status at the top changes from Not Connected to Connected. If the switch remains off after system authorization, try turning it on once more after returning to Home. If it turns off immediately or cannot establish a connection, do not keep switching it rapidly. Note the message and go to Settings and Troubleshooting.
VPN configuration authorization and server authentication are separate. Allowing the system to add a configuration only means the device permits this type of network connection; you still need to check the server address, port, and authentication details. Connected is the starting point for the next check, not proof that every website and rule is working.
For your first check, keep Home visible and wait for the connection status to stabilize before opening a browser. If you plan to switch servers or change important settings, disconnect first, save your changes, and reconnect. This makes it easier to identify which settings were used for the test. When you are done, return to Home and turn off the switch at the top.
Step complete when: You have selected a server, completed system authorization, and Home shows Connected. Do not make further configuration changes yet. First verify access to a fixed destination so you can distinguish connection setup from app access if something goes wrong.
Step 04 · Connectivity Test
Verify the Connection and Actual Access
Keep the server and routing mode you just selected, then use Connectivity Test on Home. The test checks whether the server is reachable on the current network. Results depend on Test Method, network conditions, and the destination's response. A time value does not mean every service is available; a timeout alone does not prove the password is wrong. Consider the actual access check below as well.
Next, open a browser and visit a destination you know is working and that matches the purpose of this test. Use a new page or reload it so you do not rely on previously cached content. Test one destination first, then try another. Do not change the Wi-Fi network, server, and Global Routing mode at the same time; if the result changes, it will be hard to tell which change made the difference.
If Proxy is selected, focus on whether the chosen server can complete the request. If Config is selected, also check whether the destination is expected to use a proxy or a direct route. A successful DIRECT request alone does not prove that a remote proxy is available. If a destination expected to use a proxy fails, check the matching rule and its policy.
To compare network conditions, record the current status and change only one variable at a time. For example, keep the server and configuration unchanged, switch from Wi-Fi to mobile data, and test again. If the same server fails on only one network, the troubleshooting path differs from a failure on every network. Do not choose an entry based only on its latency; use your own experience of stable access as the final measure.
Step complete when: You can state which destination opened, which mode you used, and what network you were on during the test—not just that the app showed Connected. If the result is unexpected, keep those three conditions in mind and narrow down the cause in the next step. If everything works, you can organize names and groups and back up your configuration.
Step 05 · Settings / Diagnostics
Check Settings Based on the Failure
Start troubleshooting at the step where the problem occurs. If import has not succeeded, check the URL and format. If you can see the server but the test fails, check its settings. If Connected appears but only some destinations fail, check routing and name resolution. Change one variable per attempt and repeat the same test afterward. This preserves a clear cause-and-effect relationship and avoids disrupting parts that already work.
Subscription import fails or shows no entries after an update
Check that the subscription URL is complete, has no extra spaces, and is not a single-server share link mistakenly entered as a Subscribe address. If the URL contains an expiry or access credential, confirm its current status with your service provider. Do not share the full subscription URL publicly or create multiple subscriptions with the same name. Keep the existing entry and follow the error message first. Back up any custom content you want to keep before deleting anything.
Test times out or the connection drops immediately
First confirm that the device can access the regular network when disconnected. Then check the selected server's Type, Host, Port, authentication details, and transport settings. If one server fails but other entries in the same group work, check the details for that server first. If all fail, also check the current network, subscription status, and system time. TLS connections depend on the correct time. Check automatic date and time settings in the system settings; do not disable certificate verification as a substitute for diagnosis.
Some destinations fail after Connected
Return to Home and check Global Routing to make sure Direct was not left selected. You can temporarily compare results in Proxy and Config. If the former works but the latter fails, check that the correct file is selected in Config and that the policies referenced by its rules exist. If DNS or the network behavior of a particular app is involved, read the relevant terms before changing configuration. Do not replace all settings at once.
Background behavior and Settings options
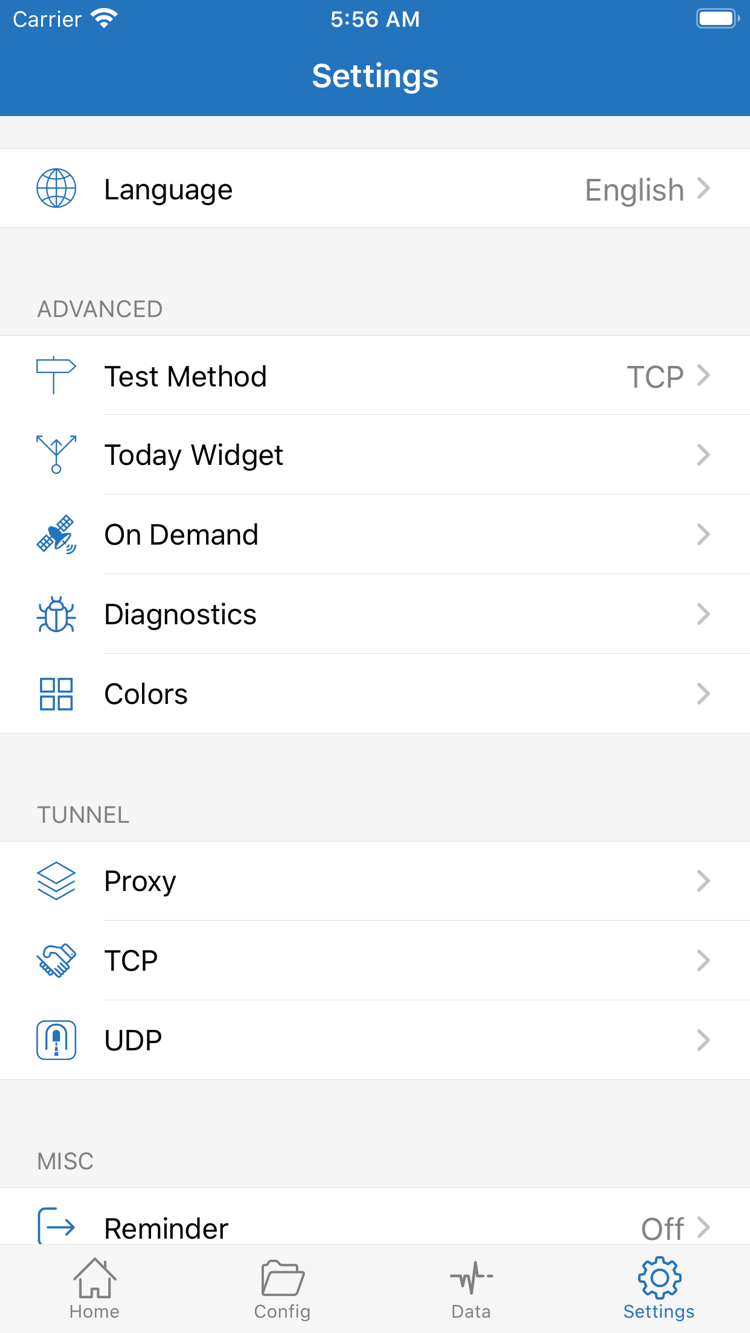
Open Settings at the bottom to find Test Method, On Demand, Diagnostics, and the Proxy, TCP, and UDP settings categories. Test Method affects how Connectivity Test works, so results from different test methods should not be compared directly. On Demand relates to automatic connections under certain conditions; it does not fix incorrect server settings. If the connection returns after you disconnect manually, first check whether the corresponding rules are enabled.
If you still cannot identify the cause, use Diagnostics to view available diagnostic information. Record the network type, Global Routing selection, test results, and message shown when the problem occurred, then decide whether to contact your service provider. Before sharing screenshots or logs, redact subscription URLs, passwords, personal addresses, and other credentials. Check for private names in SERVER as well.
Step complete when: You can place the problem in one category: import, server, system connection, or configuration rules. For help organizing multiple subscriptions, update behavior, deletion, and backups, continue to the subscription and server management guide. If you only need the meaning of an English interface term, check the glossary instead of repeating every step.